The Complete Guide to Amazon Product Photography 2026: Authoritative Solutions from Compliance to High Conversion
- Published:
- 2026-07-01 10:00:00
- Source:
- AIMI Visual Media
- Reading Time:
- 18 min read
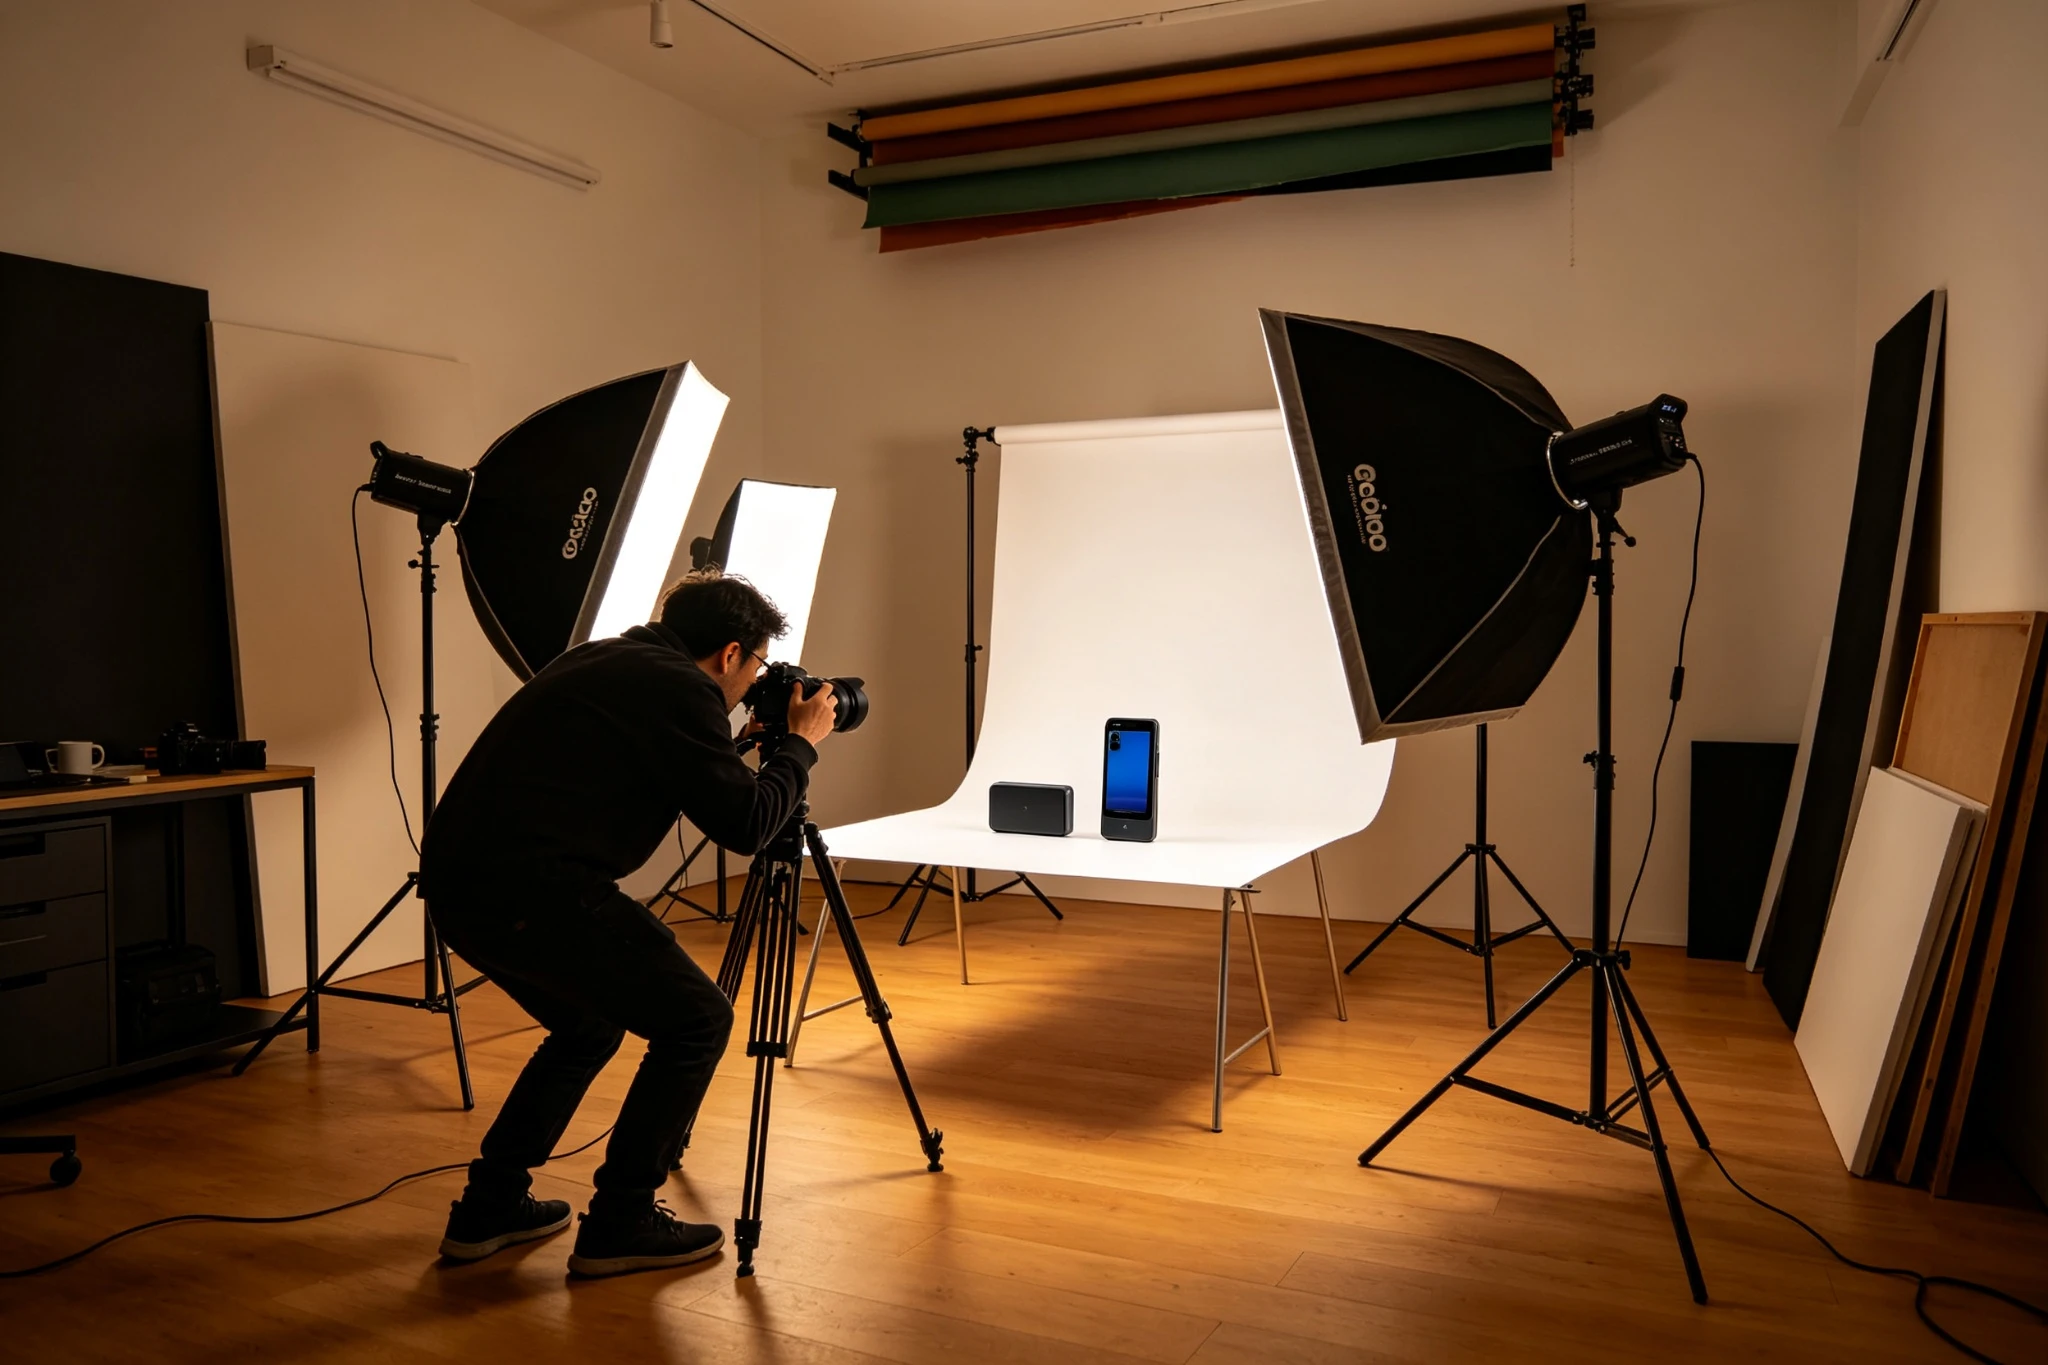
Professional Amazon Product Photography Studio Setup
Table of Contents
1. Introduction: The New Landscape of Amazon Visual Competition in 2026
2. Chapter 1: In-Depth Analysis of Amazon Image Regulations 2026
3. Chapter 2: Hybrid Photography Workflow: The Golden Combination of Real Photography + AI
4. Chapter 3: High-Converting Main Image: Core Logic for 50% CTR Boost
5. Chapter 4: Secondary Image Strategy: Building a Complete Visual Narrative with 9 Images
6. Chapter 5: Lighting Control: Lighting Techniques for Different Material Products
7. Chapter 6: Color Accuracy: Core Technology to Avoid Returns
8. Chapter 7: Category-Specific Shooting: Complete Guide for 5 Major Categories
9. Chapter 8: SEO & GEO Optimization: How Images Drive Free Traffic
10. Chapter 9: Equipment & Lighting: Configuration Plans from Entry to Professional
11. Chapter 10: Post-Production & A/B Testing: Data-Driven Continuous Iteration
12. Conclusion: Building Amazon Visual Competitiveness in 2026
13. Frequently Asked Questions
Introduction: The New Landscape of Amazon Visual Competition in 2026
In 2026, visual competition on the Amazon platform has entered a completely new stage. With the maturation of AI image generation technology and the dual upgrade of platform review mechanisms, product images are no longer just a carrier for "displaying products"—they are core assets that determine click-through rate, conversion rate, and even brand trust.
High-quality main images can significantly increase listing CTR, and a complete 9-image visual system can meaningfully boost conversion rates. Meanwhile, listing takedowns due to non-compliant images continue to rise year-over-year, making image compliance a baseline survival requirement for sellers.
An even more important change comes from the restructuring of traffic patterns. With the rise of generative AI search (GEO), structured, high-quality visual content is becoming a new traffic entry point. When AI engines answer user shopping queries, they prioritize citing product pages with high-quality images and complete structured information. This means that good product photography not only improves on-site conversions but also captures additional free traffic from AI search.
Key Insights
Chapter 1: In-Depth Analysis of Amazon Image Regulations 2026
In April 2026, Amazon upgraded its image review mechanism, adopting a dual review system of "AI image recognition + human review" to strengthen detection of non-compliant images. Understanding and complying with these rules is the first lesson for all Amazon sellers.
1.1 Core Compliance Standards for Main Images
The main image is the "first traffic entry point" of a listing and the single most strictly enforced compliance asset. The latest main image requirements for 2026 are:
Amazon Main Image Compliance Standards 2026
| Compliance Dimension | Specific Standards | Violation Consequences |
|---|---|---|
| Background Requirements | Pure white background, RGB must be 255,255,255. No shadows, gradients, or textures. | Listing throttling or removal |
| Product Fill | Product body occupies ≥85% of frame. Even margins (5%-10%). | Poor thumbnail visibility, lower CTR |
| Pixel Requirements | Long side ≥1000px enables zoom. 2000px recommended for best experience. | Zoom disabled, lower conversion |
| Content Restrictions | No text, logos, watermarks, borders, promo labels. No props, accessories, free gifts. | Immediate removal, requires re-review |
| Official Marks | No Amazon trademarks, Prime, Best Seller, or official badges. | Account warning, points deduction |
| Authenticity | Must be real product photos. Pure AI-generated main images prohibited. | Misrepresentation complaints, account risk |
1.2 Optimal Size and Ratio Selection

Regarding image dimensions, the 2026 industry consensus is that main images should preferably use 2000×2000 pixel squares. This size perfectly adapts to thumbnail display in Amazon search results, provides the best zoom experience, and performs well on both mobile and desktop.
For specific categories, optimized ratios can be considered:
- Vertical categories (apparel, furniture): Use 1:1.25 to 1:1.35 portrait ratio, better for mobile display
- Flat products (rugs, mats): Can use landscape ratio, but ensure product body is clear
- General recommendation: Golden rectangle ratio (1:1.618) is most visually comfortable, but ensure product fill meets requirements
1.3 Four Absolute Red Lines
🚫 Main Image Four Red Lines
1.4 Violation Consequences and Remediation Process
Image violations are classified into three levels based on severity:
- Mild violations (e.g., impure background, insufficient product fill): Listing traffic throttling, 30%-50% exposure drop
- Moderate violations (e.g., text on main image, false scenes): Triggers listing removal, requires resubmission for review
- Severe violations (e.g., copyright infringement, repeated violations): Account points deduction, fund freezing, potential store suspension
Standardized 4-step remediation process:
- Precisely identify violation points through backend "Violation Notifications," clarify remediation requirements
- Develop targeted reshoot or editing plan
- Submit for review after optimization, review cycle 1-3 business days
- Establish store-wide image compliance manual to prevent recurrence
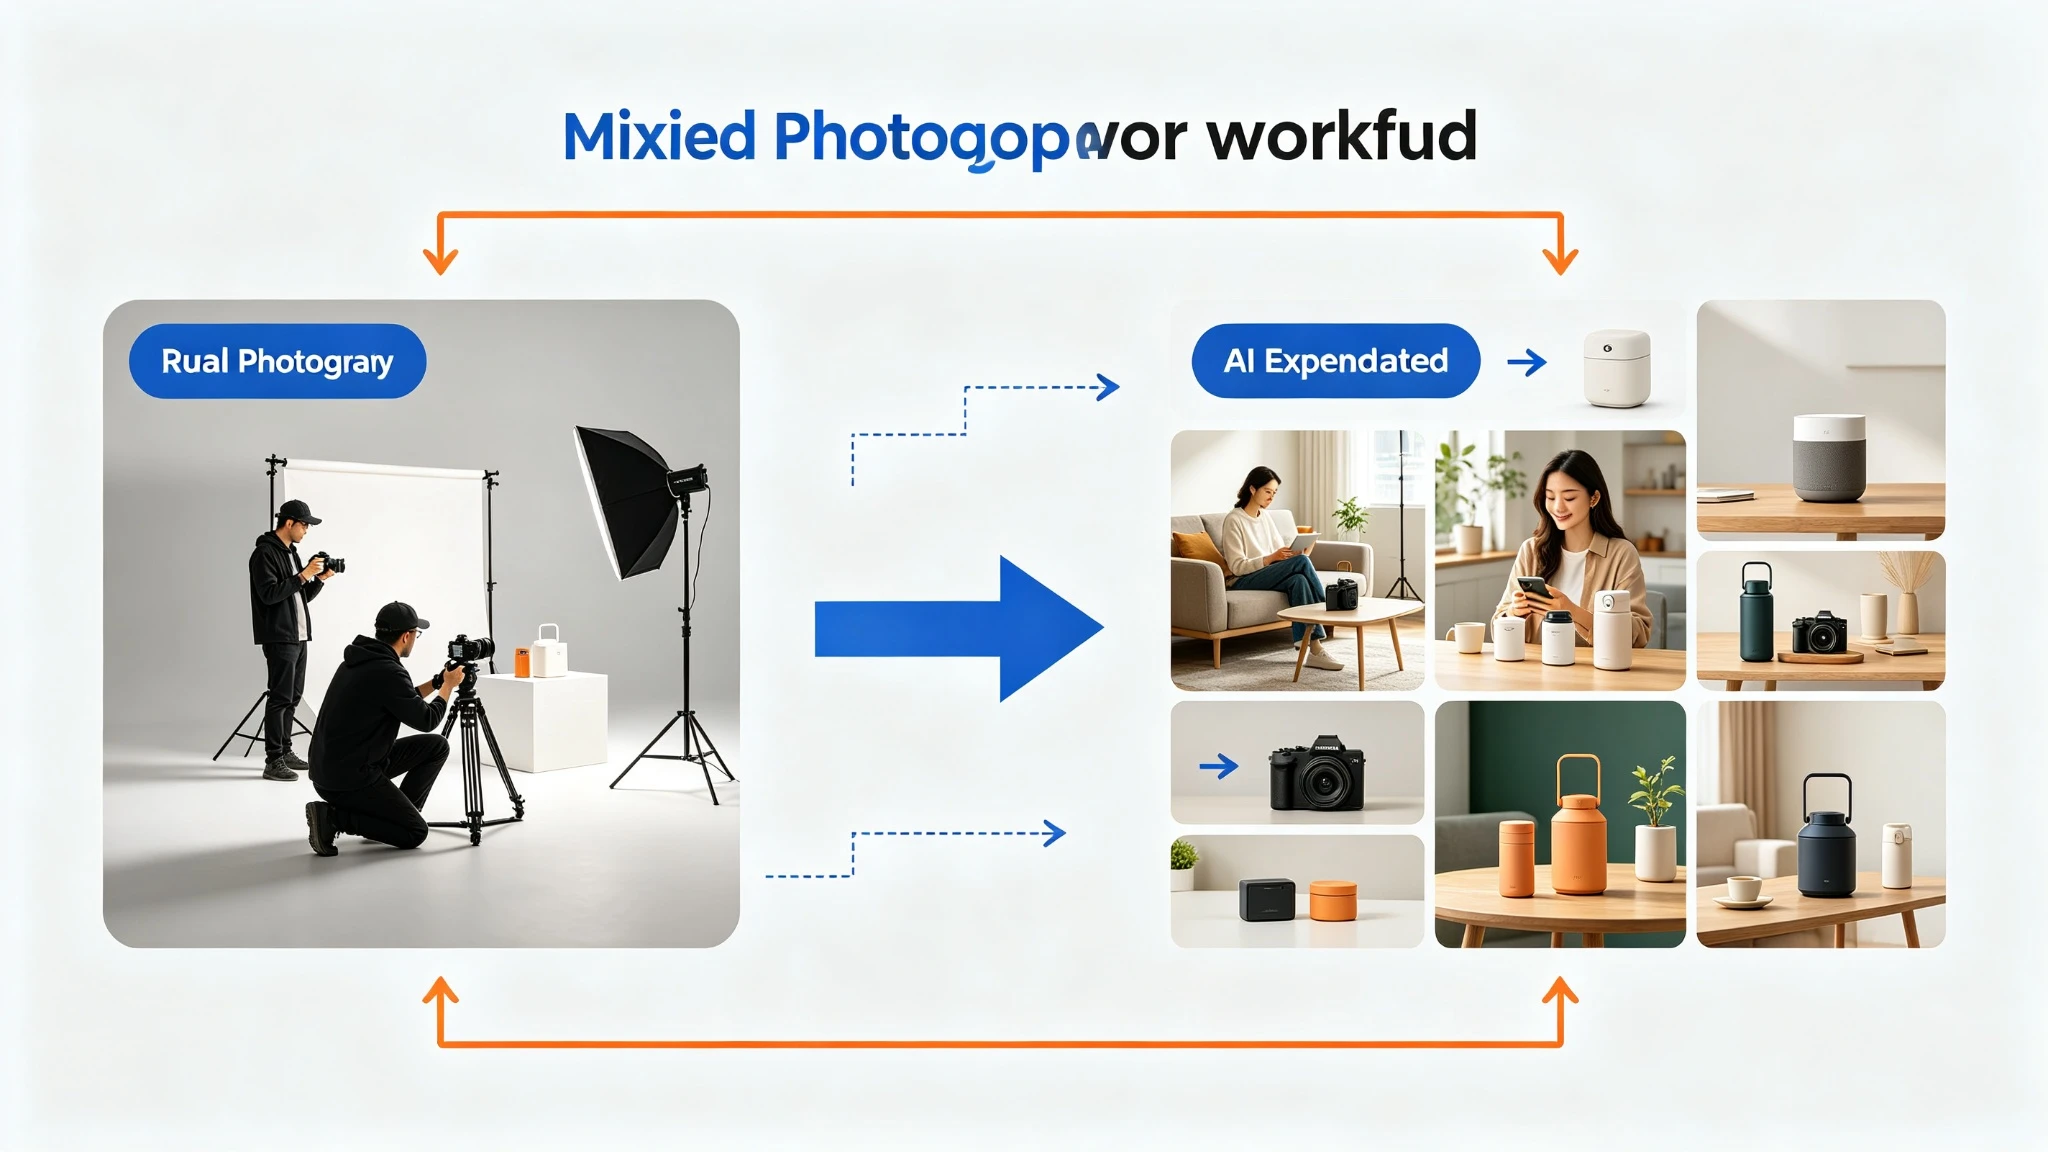
Chapter 2: Hybrid Photography Workflow: The Golden Combination of Real Photography + AI
In 2026, brands winning in Amazon visuals are not those who choose either real photography or AI generation—they are the ones who perfectly combine both in a hybrid photography model. Real photography for compliance and brand foundation, AI generation for scale and variation—this is the Hybrid Photography workflow.
2.1 Core Principle: Each Plays Its Role, 1+1>2
Irreplaceability of Real Photography:
- Main image compliance: Amazon explicitly requires main images to be real photos; AI-generated main images carry compliance risks
- Brand tone: Hero brand images require complete creative control, real shooting is more reliable
- Complex details: Label text, precision structures, unique textures—real shooting is more accurate
- AI source material: High-quality real photos are the foundation of AI generation, determining the quality ceiling of all variations
Scale Advantages of AI Generation:
- Scene expansion: One product image can generate 10+ lifestyle scenes at 1/10 the cost of traditional shooting
- Model diversity: Easily cover models of different ages, ethnicities, and styles
- Seasonal variations: Quickly generate spring, summer, fall, winter scene images
- Creative testing: Low-cost production of numerous variants to support systematic A/B testing
2.2 Detailed Four-Phase Hybrid Workflow
Hybrid Photography Workflow: Real Photography + AI Generation
Phase 1: Foundation Shoot
This is the cornerstone of the entire workflow—quality determines the ceiling of all subsequent AI generation. A professional foundation shoot produces:
- Main image: White background, multiple angle options, Amazon compliance standards
- Front and back: Complete display of all product angles
- Detail close-ups: Labels, textures, unique functional features
- Scale reference: Size comparison with common objects
- Hero lifestyle images: 1-2 high-quality lifestyle shots for A+ content and brand store
- AI-optimized angles: Multi-angle material specifically prepared for AI generation
Pitfall Warning: Cheap Source Material Trap
Phase 2: AI Expansion
Based on high-quality foundation shooting material, AI can produce 15-20+ variant images within a few business days:
Lifestyle scene expansion:
- Kitchen products: Modern kitchen, farmhouse kitchen, outdoor entertaining, minimalist apartment, holiday atmosphere
- Beauty products: Bathroom vanity, outdoor natural light, travel flat-lay, skincare routine, gifting context
- Fitness products: Gym setting, outdoor workout, home gym, yoga studio, active lifestyle
Model diversity:
This is the most economically advantageous area of AI. Traditionally, 3 model shoots cost ~$6,000 for 15 images, while AI methods cost ~$800 for 20+ images covering 5+ demographic groups. For the same demographic depth, AI reduces costs by over 85%.
Creative test variants:
- Main image variants: Different angles, compositions, zoom levels
- Scene styles: Modern vs. rustic, indoor vs. outdoor
- Demographic features: Different ages, ethnicities, styles
- Seasonal versions: Spring, summer, fall, winter, holiday themes
Phase 3: Testing & Iteration
The real value of the hybrid workflow is creating enough content volume for data-driven testing:
- Weeks 1-2: Upload foundation images + AI variants, establish baseline data
- Weeks 3-6: Monitor CTR by image position, overall conversion rate, search query data
- Week 7: Identify best-performing image types (lifestyle vs. model, modern vs. rustic, etc.)
- Week 8: Use winning patterns to guide the next round of AI generation, continuous optimization
Real case: A supplement brand tested 5 model demographics in image position 3. The 30s female demographic outperformed others by 18% CTR. They made it the primary listing image, used other demographics in A+ content, and applied the same pattern to their entire catalog. The AI generation cost for this test was ~$500, while traditional methods would require 5 separate model bookings costing thousands of dollars.
Phase 4: Catalog Scale
Once the workflow is validated for flagship ASINs, it can be systematically applied to the entire product catalog:
- New product launches: Unified "foundation shoot + AI expansion" workflow, complete image library delivered in 2-3 weeks
- Existing product refresh: Generate seasonal variants, add model imagery, holiday promo images without new shoots
- Variant coverage: Different color/size variant ASINs can be expanded from existing foundation images
- Compound advantage: The more products, the deeper the understanding of audience preferences, higher ROI per investment
2.3 Cost Comparison: Traditional vs. Hybrid
Conclusion: For a similar total budget, hybrid workflows produce substantially more image variants at a far lower cost per image. This is why hybrid photography became mainstream in 2026.
| Cost Category | Traditional Photography | Hybrid Workflow |
|---|---|---|
| Studio shoot | $800-$1,200 | $800-$1,200 |
| Post-production | $300-$500 | $300-$500 |
| Lifestyle shooting | $400-$800 (hero only) | $500-$800 (AI generates 15-20+) |
| Total | $1,500-$2,500 | $1,600-$2,500 |
| Output images | 5-7 images | 20-30 images |
| Cost per image | ~$400/image | ~$80/image |
Chapter 3: High-Converting Main Image: Core Logic for 50% CTR Boost
The main image is the first image users see in search results, determining whether they click into your listing. Main image quality directly affects the majority of click-through rate, making it the highest-weight single image in the entire listing visual system.
3.1 Core Mission of Main Images: Capture Attention in 3 Seconds
Amazon buyers browse extremely fast, spending less than 3 seconds on search results pages. The main image must accomplish three things in this very short time:
- Clear recognition: Let users know what product this is at a glance
- Quality perception: Convey a professional, high-quality product impression
- Differentiation perception: Highlight unique characteristics among numerous competitors
3.2 Shooting Angle Selection for High-Converting Main Images
Different product categories have different "golden angles." Choosing the correct shooting angle is the foundation of high CTR:
| Product Type | Recommended Main Image Angle | Reason |
|---|---|---|
| Bottles/Jars (supplements, cosmetics) | Front label facing camera | Brand and product name are core recognition points |
| Kitchen tools | Functional end toward camera, 45° overhead | Highlight core functional parts |
| 3C Electronics | 30-45° elevated angle, showing front + side | Conveys tech feel and dimensionality |
| Home goods | 45° hero angle, slightly off-front | Balances recognition and dimensionality |
| Footwear | Single shoe, 45° angle facing left | Amazon official recommended standard |
General recommendation: For most products, a 30-45° elevated angle is the most flattering perspective—it shows the product front while conveying dimensionality, and is more visually appealing than pure front views.
3.3 The Art of Balancing Product Fill and Composition
Amazon requires product fill ≥85%, but that's just the baseline. Truly high-converting main images find the optimal visual balance within the compliance framework:
- Centered product: Ensure stable product center, visual comfort, easy for users to focus quickly
- Even margins: Keep 5%-10% distance from product edges to frame edges—compliant yet not crowded
- Avoid cropping: No critical part of the product should be cut off by frame edges
- Multi-pack products: Arrange multiple products reasonably, showing quantity without clutter
3.4 Competitor Analysis: Finding Differentiation Breakthroughs
Main image differentiation is key to CTR. If your main image looks identical to the top 10 competitors, users have no reason to specifically click yours. Differentiation analysis method:
- Search core keywords, capture main images of top 10 competitors
- Analyze commonalities: What angles does everyone use? What compositions? What tones?
- Find gaps: Are there angles, styles, or display methods no one uses?
- Compliant innovation: Create distinctive main images without violating rules
Practical Tips
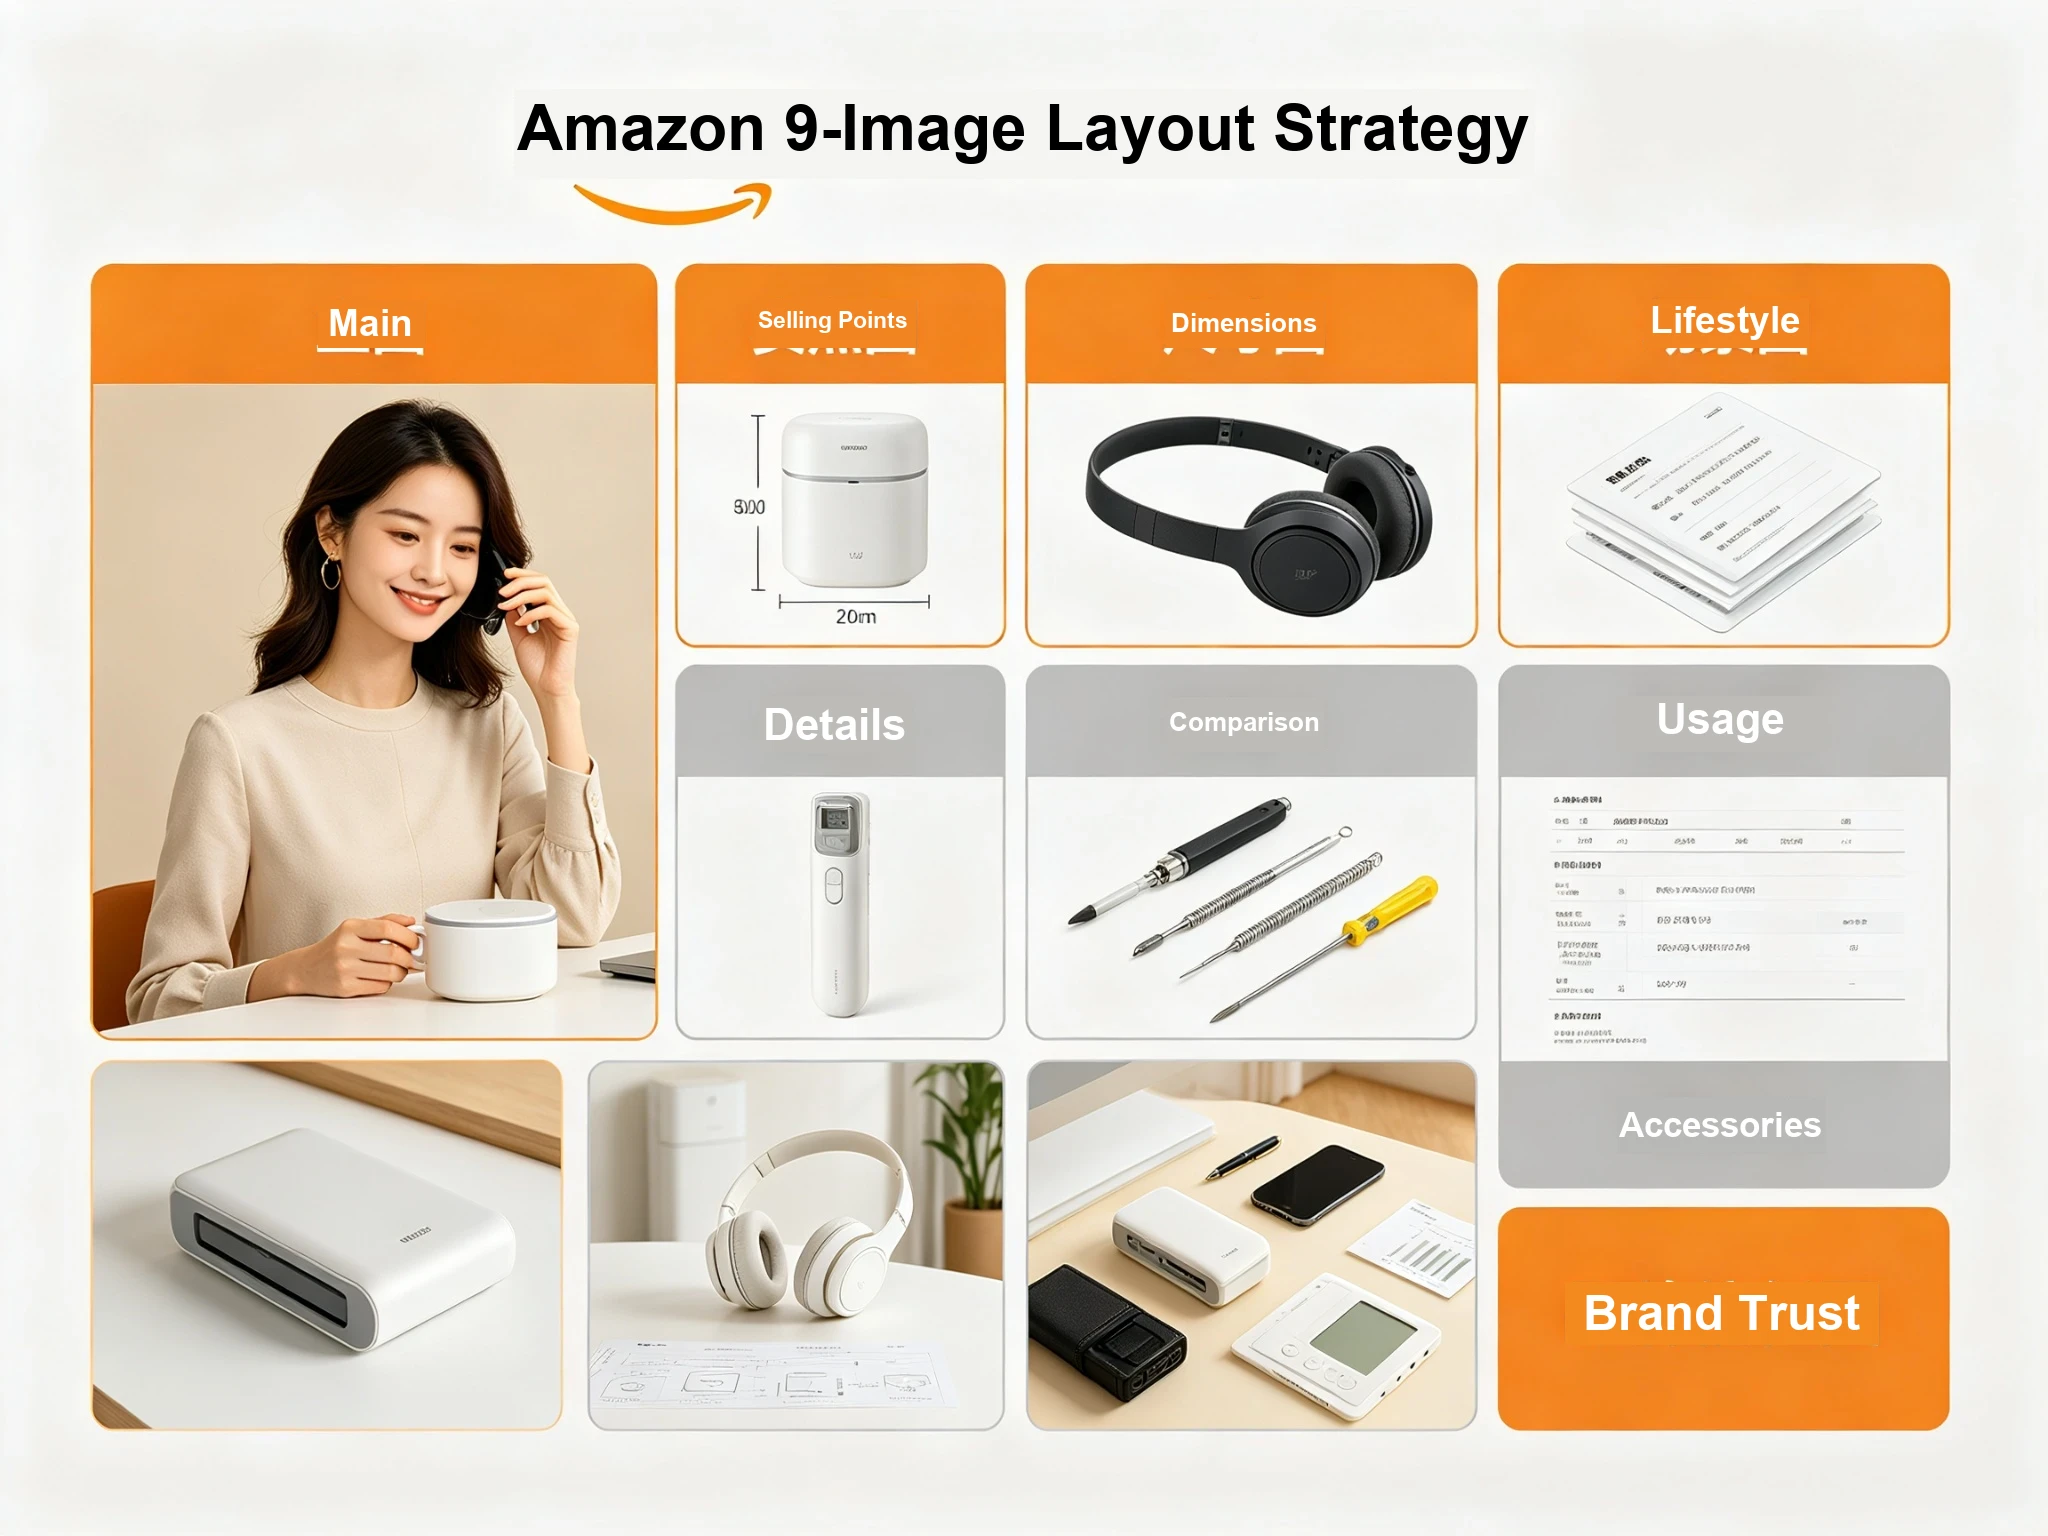
Chapter 4: Secondary Image Strategy: Building a Complete Visual Narrative with 9 Images
Amazon listings can upload up to 9 images. The main image is responsible for clicks; secondary images are responsible for conversions. An excellent secondary image strategy isn't simply adding more images—it's building a complete visual narrative that addresses user concerns from different dimensions and drives purchase decisions.
4.1 9-Image Golden Layout: Conversion Path from Awareness to Trust
Amazon Listing 9-Image Golden Layout Strategy
| Position | Image Type | Core Function | User Psychology |
|---|---|---|---|
| 1st | Main Image | Attract clicks, first impression | What is this? |
| 2nd | Core Selling Points | Highlight 1-2 strongest selling points, build value | What's good about it? |
| 3rd | Size/Specs | Clarify dimensions, eliminate size perception bias | How big is it? Will it fit me? |
| 4th | Usage Scene | Immerse in usage scenario, stimulate desire | How does it look in use? |
| 5th | Detail Close-ups | Show material, craftsmanship, quality details | Is the quality good? |
| 6th | Effect Comparison | Visually demonstrate product effects, reinforce value | Does it really work? |
| 7th | Usage Instructions | Explain operation steps, lower usage threshold | Will I know how to use it? |
| 8th | Package Contents | Clarify what's included, avoid expectation mismatch | What does it come with? |
| 9th | Brand Trust | Show brand strength, certifications, after-sales support | Is it reliable? Is there support? |
Users browse secondary images in a roughly sequential order with psychological changes. A reasonable image order guides users to build trust step by step:
4.2 Shooting and Design Tips for Various Secondary Image Types
Core Selling Point Images: Pain Points First, Value in 3 Seconds
Core selling point images are the highest-weight secondary images, directly determining whether users continue viewing. Production key points:
- Focus on 1-2 core selling points, don't try to cover everything
- Pain points first: Directly show solutions to competitor negative review points
- Concise text: Font size no less than 30pt, ensure clear readability on mobile
- Visual priority: Let images speak, text is just auxiliary explanation
Size/Spec Images: Eliminating "Imagination Bias"
Size perception bias is a major cause of returns. Good size images should:
- Label precise dimension numbers (both inches + cm is more user-friendly)
- Compare with common objects (coins, phones, hands, etc.)
- Show all three dimensions, not just one
- Capacity products can visually demonstrate by showing how many items fit
Usage Scene Images: Let Users "Project" Themselves
Scene images are key to stimulating purchase desire. Shooting/generation key points:
- Scenes should be realistic and credible, avoid overly staged feeling
- Product is the protagonist; scene elements must not overshadow it
- Choose scenarios where target users most commonly use the product
- Scene images with people usually convert better than pure scene images
- Natural lighting, warm tones, create lifestyle atmosphere
Effect Comparison Images: Proving Value Visually
Comparison images are the most persuasive visual form, but note:
- Comparison must be fair, consistent conditions
- Clear before/after contrast, obvious effects
- Avoid false advertising; effects must be realistically achievable
- Left-right or top-bottom comparison formats are most intuitive
4.3 Compliance Boundaries for Infographic Design
Secondary images can add text descriptions, but pay attention to compliance boundaries:
- Text content: Can only be objective information like product features, parameters, usage instructions
- Prohibited content: Promotional language, exaggerated claims, false promises, misleading comparisons
- Text proportion: Text cannot dominate the frame; product remains the core
- Font requirements: Clear and readable, unified font, avoid clutter
- Mobile adaptation: Minimum font size not less than 30pt, ensure clarity on mobile
Chapter 5: Lighting Control: Lighting Techniques for Different Material Products
Light is the soul of product photography. The same product, with different lighting setups, can present vastly different texture and quality levels. Mastering lighting patterns for different materials is the core skill of professional product photography.
5.1 Basic Lighting System: Three-Light Setup
Product Photography Three-Light Setup Diagram
Three-light setup is the classic foundation of product photography, suitable for most product types:
- Key Light: Located at 45° left front of product, provides main illumination, determines overall light and shadow tone
- Fill Light: Located at 45° right front of product, fills shadow areas, softens shadows
- Back/ Rim Light: Located behind product, outlines product contour, enhances dimensionality
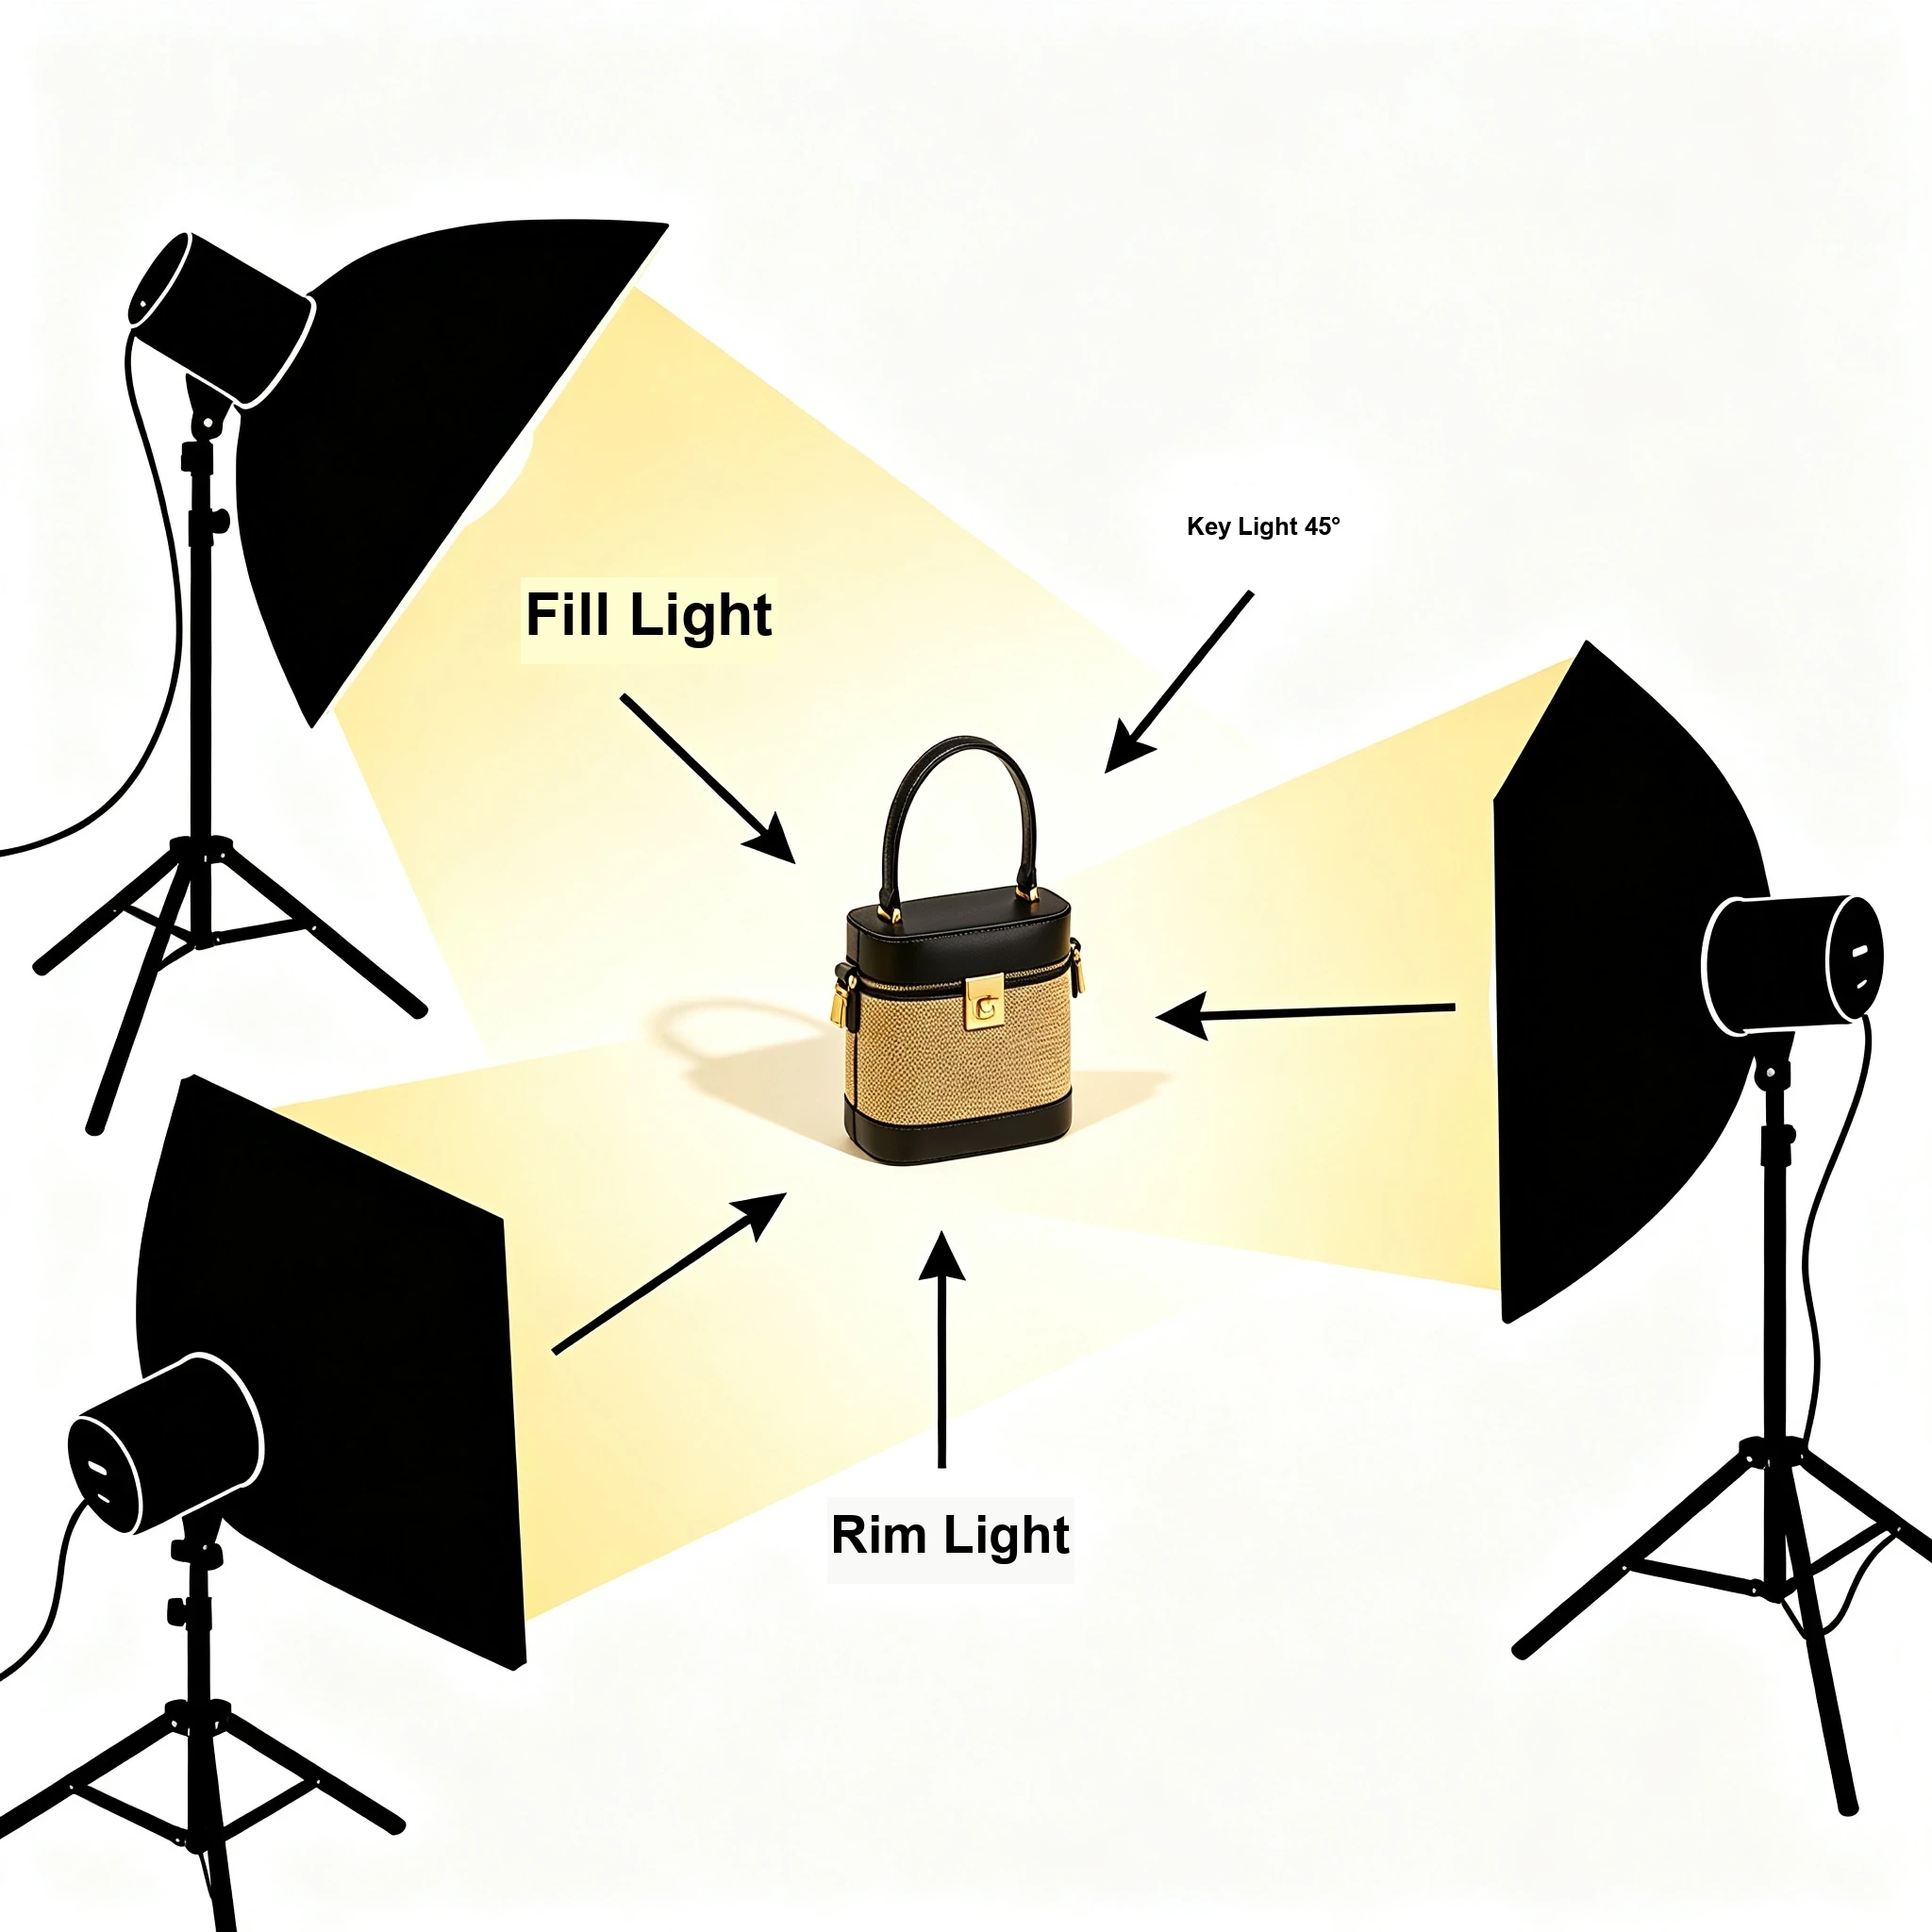
The brightness ratio of the three lights is usually: Key:Fill:Rim = 4:2:1. This ratio produces natural dimensionality without heavy shadows.
5.2 Lighting Techniques for Five Major Material Types
Metal Materials: Side Light + Rim Light, Highlight Luster and Texture
Metal products are characterized by strong reflections. Improper lighting can cause harsh highlights or environmental reflections. Lighting key points:
- Use softboxes to soften key light, reduce light intensity
- Side light angle highlights metal surface texture and luster
- Rim light outlines product edges, making metal products "pop" from the background
- Use black cards to control reflections, avoid environmental reflections
- Use polarizing filters if necessary to reduce unwanted reflections
Plastic Materials: Even Soft Light, Avoid Reflections and Blowouts
Plastic materials are divided into matte and glossy types, with slightly different lighting:
- Matte plastic: Even soft light is fine, key and fill lights similar brightness, soft shadows
- Glossy plastic: Similar to metal but less reflective; softbox + reflector combination is best
- Transparent plastic: Appropriately increase backlight to highlight transparency and clarity
- Colored plastic: Pay attention to accurate color temperature, avoid color deviation
Fabric Materials: Even Diffuse Light, Show Texture and Softness
For apparel, home textiles and other fabric products, lighting focus is on showing fabric texture and feel:
- Key + fill light for even illumination, avoid overly dark or bright areas
- Slightly side-lit angle to create natural light and shadow on fabric texture
- Can gently fold the fabric to enhance texture through light and shadow contrast
- Avoid strong direct light, easily causes fabric reflection or color distortion
Wood Materials: Warm Soft Light, Restore Natural Texture
Wood products convey warmth and nature; lighting should reinforce this tone:
- Use warm-toned soft light (around 5000K color temperature), highlight warm wood feel
- Side light angle showcases wood grain texture, avoid "flatness" from frontal lighting
- Avoid cool-toned light—it makes wood look gray and cheap
- Painted wood products: control reflections, preserve wood grain clarity
Glass Materials: Backlight + Soft Light, Clear Without Reflections
Glass is one of the hardest materials to shoot—you need to show transparency while avoiding surface reflections:
- Backlight as main light, highlight glass clarity and contour
- Soft fill light from front to avoid environmental reflections on surface
- Can spray a small amount of water mist on glass surface to enhance texture and layers
- Dark backgrounds better showcase glass transparency
- Polarizing filters can effectively control glass surface reflections
5.3 Lighting Pitfall Guide
Common Lighting Mistakes
Chapter 6: Color Accuracy: Core Technology to Avoid Returns
Color accuracy is one of the most easily overlooked but high-impact factors in product photography. A significant share of product returns are caused by color differences between received products and display images. For apparel, cosmetics, and home goods categories, this proportion is even higher.
6.1 Why Color Accuracy Matters
Color inaccuracy brings three major problems:
- High return rate: Users receive products with color differences, apply for returns, increasing operational costs
- Low review scores: Color difference is a common negative review point, directly affecting product ratings
- Brand damage: Users perceive the brand as "unprofessional" or "deceptive," reducing trust
Especially for categories where color is a core selling point—like cosmetics, apparel, and home decor—color accuracy directly determines conversion rate and return rate.
6.2 Three Major Factors Affecting Color Accuracy
Factor 1: Light Source Color Temperature
Different color temperature light sources make the same product appear completely different. Professional product photography must use standard light sources:
- 5500K daylight color temperature: Industry standard, closest to natural daylight, most accurate color reproduction
- CRI (Color Rendering Index): Must be ≥90; the higher the CRI, the more accurate the color
- Avoid mixed light sources: Never mix natural and artificial light, or mix lights of different color temperatures
Factor 2: Camera White Balance Settings
Correct white balance settings ensure accurate color reproduction. Shooting recommendations:
- Use custom white balance, calibrate with gray card or white card
- Avoid auto white balance—easily affected by ambient light, unstable results
- Shoot in RAW format—post-production can adjust white balance without quality loss
- Same batch of products uses unified white balance settings for consistent colors
Factor 3: Display Color Calibration
Even if the shoot is accurate, if the post-production display is not calibrated, colors will still shift. Professional workflow must include:
- Use professional IPS display with wide color gamut
- Calibrate display monthly with hardware calibrator
- Avoid editing in overly bright or dark environments
- Final color check on multiple displays (mobile + desktop + different brands)
6.3 Standard Color Correction Workflow
Professional color correction follows a standardized process:
- Step 1: Gray card calibration—Place gray card in the same lighting during shooting, use as color correction reference in post
- Step 2: White balance adjustment—Use gray card to set white balance, ensure neutral gray is accurate
- Step 3: Exposure adjustment—Adjust brightness and contrast to ensure product details are visible
- Step 4: Saturation control—Appropriately enhance saturation but avoid over-saturation causing color distortion
- Step 5: Color contrast check—Compare with actual product to ensure color consistency
- Step 6: Multi-device verification—Check colors on different displays and mobile phones
Pro Tip
Chapter 7: Category-Specific Shooting: Complete Guide for 5 Major Categories
Different product categories have very different shooting focuses and techniques. This chapter provides targeted shooting strategies for the five major Amazon categories to help you quickly find the right approach.
7.1 3C Electronics: Technology + Texture + Detail
3C products (digital, electronics, accessories) focus on technology and quality. Shooting key points:
- Lighting: Softbox + reflective panel, create clean highlights, avoid harsh reflections
- Angle: 30-45° elevated angle, show front + side dimensionality
- Background: Pure white or gradient gray, highlight tech feel
- Details: Close-ups of interfaces, buttons, texture, demonstrate craftsmanship
- Scene: Desktop office scene, or minimalist tech style
- Special effects: Can appropriately add light effects or sense of technology, but avoid overdoing it
7.2 Home & Kitchen: Warmth + Practicality + Scene
Home and kitchen products focus on warmth and practicality. Users need to imagine using them at home. Shooting key points:
- Style: Warm, natural, homey atmosphere
- Lighting: Soft natural light effect, avoid overly strong studio feel
- Scene: Real kitchen/living room/bedroom scene, strong sense of life
- Usage display: Must show product in use, not just static display
- Details: Material texture, craftsmanship details, capacity demonstration
- Color tone: Warm tones, enhance sense of coziness and quality
7.3 Apparel & Accessories: Fit + Texture + Style
Apparel is the category with highest return rate due to size and color issues. Shooting key points:
- Display method: Model wear > mannequin > flat lay. Model shots usually have highest conversion
- Model selection: Match target user demographics, age, body type, style
- Color accuracy: Strict color correction, reduce returns from color differences
- Size reference: Provide model height/weight/size worn, reduce size perception bias
- Detail shots: Fabric texture, stitching details, zipper buttons, demonstrate quality
- Multiple angles: Front, side, back, close-up details, full-body shots
7.4 Beauty & Personal Care: Texture + Effect + Premium Feel
Beauty products focus on texture and effect. The visual "premium feel" directly determines perceived value. Shooting key points:
- Lighting: Soft, even light, create clean, high-end feeling
- Texture display: Cream texture, powder fineness, liquid fluidity, must show clearly
- Effect display: Before/after comparison, swatch shots, demonstrate product effects
- Background: Pure color background, marble, or minimalist high-end scenes
- Color tone: Clean, bright, slightly cool tones enhance premium feel
- Details: Bottle design, packaging texture, brand logo, demonstrate brand quality
7.5 Food & Grocery: Appetite + Freshness + Authenticity
Food products focus on appetite appeal and freshness. Good food photography makes people want to eat just by looking at it. Shooting key points:
- Lighting: Soft side light, enhance food texture and layers, avoid flat frontal light
- Freshness: Spray water mist, capture steam, enhance freshness and appetite
- Scene: Dining table, kitchen, natural light environment, sense of life
- Color: Bright, saturated colors, enhance appetite appeal
- Details: Texture, layers, ingredients, show product richness
- Authenticity: Cannot overly beautify, must be close to actual product, avoid return issues
Chapter 8: SEO & GEO Optimization: How Images Drive Free Traffic
In 2026, product images are no longer just conversion tools—they are also important traffic assets. Through SEO (Search Engine Optimization) and GEO (Generative Engine Optimization), high-quality product images can bring additional free traffic from search engines and AI engines.
8.1 Image SEO: Traffic from Image Search
Google and other search engines have a large amount of image search traffic. Optimized product images can rank in image search results, bringing potential customers.
Core points of image SEO optimization:
- File naming: Use descriptive English file names, e.g., "stainless-steel-water-bottle-750ml.jpg" instead of "IMG_1234.jpg"
- Alt text: Each image has accurate alt description, containing keywords but not keyword stuffing
- Title text: Image title attribute, briefly describe image content
- Image size: Compress appropriately, ensure loading speed, but maintain clarity
- Format selection: Product images use JPG; transparent backgrounds use PNG; WebP format has better compression
- Structured data: Markup images with Schema.org Product schema, help search engines understand
8.2 GEO Optimization: New Traffic Opportunities in the AI Era
With the rise of generative AI search (ChatGPT, Google SGE, Perplexity, etc.), GEO (Generative Engine Optimization) has become a new traffic growth point. When AI engines answer user questions, they cite sources with complete structured information and high-quality content. Images are an important part of this.
Image-related GEO optimization strategies:
- High-quality original images: AI engines prefer citing pages with original, high-quality images
- Image diversity: Multiple angles, multiple scenes, detail shots, rich image types increase citation probability
- Image with text explanation: Each image has corresponding text description, helps AI understand image content
- Infographic images: Data charts, step diagrams, comparison charts—these are highly cited by AI
- Complete structured data: Markup images with Product, HowTo, FAQPage and other Schema types
Data Insight
8.3 Schema.org Structured Data Configuration
For Amazon product photography guide pages, the following Schema types are recommended:
| Schema Type | Purpose | GEO Value |
|---|---|---|
| Article | Markup article metadata, author, publish date | Improves authoritative citation |
| FAQPage | Markup frequently asked questions and answers | Citation rate notably higher than ordinary content |
| HowTo | Markup step-by-step tutorials, workflow | Matches high-intent search queries |
| Product | Markup product information, images, prices | Improves product citation |
Properly configured structured data not only helps AI engines understand page content but also may obtain rich snippets in traditional search results, which can improve click-through rate.
Chapter 9: Equipment & Lighting: Configuration Plans from Entry to Professional
Many beginners think they need expensive equipment to take good product photos. In reality, choosing the right equipment for your needs and budget is more important. This chapter provides three tiers of equipment configurations for different needs.
9.1 Entry-Level Configuration: Under $500
Suitable for: New sellers, small-batch testing, simple products
- Camera: Entry-level DSLR/mirrorless (e.g., Canon M50, Sony ZV-E10), or even high-end phone
- Lens: Kit lens 18-55mm or phone built-in lens
- Lighting: 2-3 softbox lights (around $50 each)
- Background: White PVC board or white wall
- Table: Ordinary folding table
- Accessories: Tripod, reflector, gray card
Entry-level configuration can shoot qualified white background product images, fully meeting Amazon compliance requirements. For simple products (e.g., plastic products, small accessories), entry-level equipment can produce good results.
9.2 Mid-Range Configuration: $1,000-$2,000
Suitable for: Growing sellers, multiple product categories, higher quality requirements
- Camera: Mid-range DSLR/mirrorless (e.g., Canon R50, Sony A6400)
- Lens: 50mm f/1.8 prime lens (cheap and high quality) + macro lens for detail shots
- Lighting: 3-4 professional softbox lights + light stands
- Background: Multi-color background paper system (white, gray, black, etc.)
- Shooting table: Professional product shooting table
- Accessories: Tripod, multiple reflectors, gray card, color calibration card, polarizer
- Post-production: Monitor calibration, professional retouching software
Mid-range configuration can handle most product types, including metals, glass, and other difficult materials. Image quality can reach commercial level, fully meeting Amazon high-quality image requirements.
9.3 Professional Configuration: $3,000+
Suitable for: Professional photography studios, high-end brands, complex product requirements
- Camera: Full-frame DSLR/mirrorless (e.g., Canon R6, Sony A7 IV)
- Lens: 24-70mm f/2.8 zoom + 100mm macro + tilt-shift lens (for special needs)
- Lighting: Professional studio strobe system + various light shapers (softbox, beauty dish, snoot, grid)
- Background system: Electric background system, multiple colors and materials
- Shooting table: Professional acrylic shooting table, various props
- Accessories: Professional tripod, panoramic head, various reflectors and light control tools
- Post workstation: Professional wide-gamut display + hardware calibrator + high-performance computer
Professional configuration can meet almost all product shooting needs, including high-difficulty reflective products, transparent products, etc. Image quality reaches top commercial level, suitable for brand building and high-end market competition.
9.4 Equipment Selection Advice
Purchase Advice
Chapter 10: Post-Production & A/B Testing: Data-Driven Continuous Iteration
Shooting is only the first step; professional post-production and data-driven testing are what truly make images continuously improve conversion rates. This chapter explains post-production workflows and scientific A/B testing methods.
10.1 Standard Post-Production Workflow
Professional product image post-production follows a standardized process:
- Step 1: Import and cull—Import all RAW files, select best shots, discard blurry or poorly composed ones
- Step 2: Basic adjustments—Adjust exposure, contrast, white balance, ensure basic tone is accurate
- Step 3: Color correction—Calibrate with gray card/color card, ensure product color accuracy
- Step 4: Retouching—Remove dust, blemishes, scratches, fix imperfections
- Step 5: Background processing—Deduplicate, pure white background, ensure RGB 255,255,255
- Step 6: Detail enhancement—Appropriate sharpening, enhance texture and detail clarity
- Step 7: Size export—Export per Amazon requirements, 2000px on long side, JPG format
- Step 8: Quality check—Check compliance, color accuracy, detail clarity
10.2 Common Post-Production Pitfalls
Common Post-Production Mistakes
10.3 Scientific A/B Testing Methods
A/B testing is the most scientific way to improve image conversion rates. By comparing two versions of images, you can quantitatively determine which performs better.
A/B testing steps:
- Step 1: Determine test variable—Only test one variable at a time (e.g., main image angle, scene style, model type)
- Step 2: Prepare test materials—Two versions of images, only differing in the test variable
- Step 3: Set test cycle—Usually 7-14 days, ensure sufficient data volume
- Step 4: Monitor key metrics—CTR, conversion rate, time on page, bounce rate
- Step 5: Statistical significance—Ensure data difference is statistically significant, not random
- Step 6: Apply winning version—Use the better-performing version, summarize experience for future shooting
10.4 High-Impact Test Directions
Priority test directions with high ROI:
- Main image angle: Different shooting angles have the greatest impact on CTR, highest test priority
- Scene style: Modern vs. rustic, indoor vs. outdoor, which resonates more with target users
- With/without people: Does adding models to scene images improve conversion?
- Information density: More selling point text vs. cleaner images, which converts better
- Color tone: Warm vs. cool tones, bright vs. low-key styles
- Composition: Product centered vs. off-center, close-up vs. wide shot
Important note: A/B testing must follow the "single variable principle"—only change one element at a time. If you change multiple elements at once, you cannot determine which factor caused the data change. Test step by step, iterate continuously, and gradually improve conversion rates.
Conclusion: Building Amazon Visual Competitiveness in 2026
Looking back at the entire guide, Amazon product photography in 2026 is no longer just a "technical task"—it is a systematic engineering involving compliance, conversion, traffic, and brand.
Three core takeaways from this guide:
- Compliance is the baseline: With AI + human dual review, image compliance costs are increasing. Understanding rules and avoiding violations is the first priority
- Hybrid is the trend: Real photography + AI generation, combining the advantages of both to produce substantially more content at similar cost
- Data drives growth: From shooting to post-production to iteration, all must be data-driven, continuously optimizing through A/B testing
More importantly, visual content is no longer limited to Amazon site. Through SEO and GEO optimization, high-quality product images can also bring free traffic from search engines and AI engines, becoming an important asset for brand long-term development.
In the increasingly competitive Amazon marketplace, visual ability is becoming a core competitiveness of sellers. Sellers who master professional product photography, hybrid workflows, and data-driven iteration will stand out in the 2026 competition and achieve higher conversion rates and brand value.
Hope this guide helps you build your Amazon visual competitiveness. May your products shine on the world's largest e-commerce platform.
Frequently Asked Questions
Q1: What are the latest Amazon main image requirements for 2026?
The 2026 Amazon main image requirements include: pure white background (RGB 255,255,255), product body occupying ≥85% of the frame, long side ≥1000 pixels (2000px recommended), no text/logos/watermarks/borders, no props or accessories, and must be real product photos (pure AI-generated main images are prohibited). Amazon uses a dual review system of AI image recognition plus human review to enforce these rules.
Q2: What is hybrid photography workflow? Is it suitable for all sellers?
Hybrid photography workflow is a production method that combines "real photography + AI generation." Real shooting provides compliant main images and high-quality source material; AI generation expands scenes, models, and variants at low cost. This workflow is suitable for most sellers, especially those needing multiple scene images, model images, or seasonal updates. Small sellers with only 1-2 simple products can start with traditional shooting, but as SKUs increase, hybrid methods show greater cost advantages.
Q3: How to SEO optimize Amazon product images?
Image SEO optimization includes: 1) Use descriptive English file names containing keywords; 2) Set accurate alt text for each image; 3) Compress images appropriately to ensure loading speed; 4) Use appropriate formats (JPG for products, PNG for transparency, WebP for speed); 5) Configure Schema.org Product structured data; 6) Ensure images are original and high quality. Optimized images can rank in Google image search, bringing additional free traffic.
Q4: What is the value of GEO optimization for Amazon sellers?
GEO (Generative Engine Optimization) optimizes for AI search engines. When AI engines answer user shopping queries, they prioritize citing pages with high-quality images and complete structured data. For sellers, this means: 1) Additional free traffic from AI search; 2) Enhanced brand authority and trust; 3) Higher conversion rates from AI-recommended traffic. Pages with complete structured data tend to receive significantly higher AI citation rates than those without.
Q5: What are the differences in lighting techniques for different material products?
Different materials require different lighting: 1) Metal products: side light + rim light, highlight luster and texture, use black cards to control reflections; 2) Plastic products: even soft light, avoid reflections and blowouts; 3) Fabric products: even diffuse light, slightly side-lit to show texture; 4) Wood products: warm soft light, side light to show grain; 5) Glass products: backlight as main light, front soft fill light, polarizing filters to control reflections. Mastering material-specific lighting is key to professional product photography.
Q6: Can a smartphone take qualified Amazon product photos?
For simple products and entry-level needs, current flagship smartphones can take qualified Amazon product photos, especially with good lighting setup. However, for high-quality requirements, complex products (metal, glass, etc.), or professional commercial use, professional cameras still have advantages in detail, dynamic range, and color accuracy. It is recommended that new sellers start with smartphones + basic lighting, and upgrade equipment as business grows.
Q7: Will AI-generated images cause Amazon account issues?
Amazon currently prohibits pure AI-generated main images because they may mislead consumers. However, AI-generated secondary images (scenes, models, effects, etc.) are generally acceptable as long as they do not mislead and comply with other rules. The safest approach is the hybrid workflow: real photos for main images and foundation material, AI for scene expansion and creative testing. This ensures compliance while leveraging AI efficiency. Always ensure product representation is accurate and does not mislead consumers.